
Showing posts with label my designs. Show all posts

Thursday, July 11, 2024

how to crochet a cute bucket hat of any size (customisable & beginner friendly pattern)

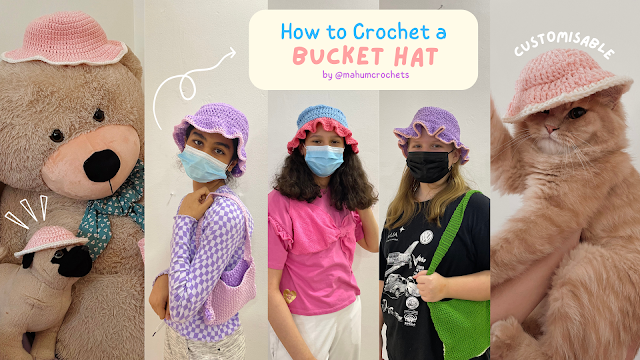
Hi everyone! With this pattern, you can crochet yourself or your pets (or stuffed animals!) a bucket hat with a really cute frilly trim. 

A note on the pattern for beginners:

This summer, I had the opportunity to teach an in-person crochet course to a group of lovely girls at Wild About Art Co studio in Bahrain. All of them were complete beginners when I taught them how to make this bucket hat, so if you're a beginner, you can make this too. You can see how their hats turned out in the picture above! Using what I learned from teaching them, I adjusted this pattern to make it even easier. You do not need to know how to make or work with a magic ring! I understand how confusing and frustrating magic rings can be for beginners, that's why I've included an easier alternative for which you just need to chain and slip stitch for. I've also included extra commentary and tried to explain things in as much detail as I can, I hope that helps you create this bucket hat and I'm so glad that I get to be a part of your crochet journey!

Here are a few things to keep in mind while using this pattern:

To make this, you should know how to make a slip knot, chain, double crochet, and slip stitch. Apart from that, I have included step-by-step instructions for crocheting in a round and how to increase stitches. That being said, I can't wait to see what you come up with! Please tag me in your creations (or send me a picture!) and feel free to DM me on Instagram (@mahumcrochets) if you have any questions.

Materials & Terminology:

I used a 4.5 mm hook and 2 yarn colors appropriate for that hook size. Abbreviations: CH - chain, DC - double crochet, SS - slip stitch, increase - insert 2 stitches into the same stitch (explained further in the pattern too).

Part 1: The crown (top of the bucket hat)

Round 1 (total 10 stitches) - [if you know how to make a magic ring, please skip the steps in pink and instead just make a magic ring] start by making a slip knot and ch 5, ss into the first ch that you made (this will make a circle in between your chains, you can use this method as a substitute for magic ring), ch 2 and insert 10 dc into your circle, insert the hook into the top of the ch 2 you made at the beginning and ss to end the round.

Round 2 (total 20 stitches) -  start the next round with ch 2, from now on you're going to be working into the dc stitches made in the previous rounds, insert 2 dc into the same stitch for every stitch around the round (inserting 2 stitches into the same stitch is called an increase), ss into the top of the ch 2 to end the round.

Round 3 (total 30 stitches) - start the next round with ch 2, repeat the pattern in asterisks all around the round * dc, increase (for beginners: insert 2 dc into the same stitch)*, ss into the top of the ch 2 to end the round.

Round 4 (total 40 stitches) - start the next round with ch 2, repeat the pattern in asterisks all around the round * dc, dc, increase*, ss into the top of the ch 2 to end the round.

Round 5 (total 50 stitches) -  start the next round with ch 2, repeat the pattern in asterisks all around the round * dc, dc, dc, increase*, ss into the top of the ch 2 to end the round.

TO CUSTOMISE THE SIZE: keep doing rounds until the top of your bucket hat is as big as your head (or your pet's or whoever you're making it for!). As you continue doing the rounds for the top part, add 1 more dc to the pattern in asterisks before your increase each time. So for example, in round 6, you would do *dc, dc, dc, dc, increase*. Don't forget to ch 2 before you start your next round and ss into the top of the ch 2 to end each round. For reference, my students and I did 6-8 rounds for our hats + I did 3 rounds for my kitten's hat.

Part 2: The body

For the body, you don't have to do any increases in the rounds. Start each round with a ch 2, insert 1 dc into every stitch around the round, end with a ss into the top of the ch 2. Do as many rounds as needed to fit your head.

Part 3: The frilly brim & other customizations

Round 1: after finishing the rounds for the body of the hat, start the next round with a ch 2, insert 1 dc into the BACK LOOPS only of every stitch around the round, end the round with a ss into the top of the ch 2. Crocheting in the back loops makes the frill part of your hat curve outwards!

For the next rounds, we will follow the same technique as the crown of the hat.

Round 2: start with a ch2, repeat the pattern in asterisks till the end of the round *dc, dc, increase*, ss to end the round.

Round 3 onwards: start the rounds with a ch 2, as you continue doing the rounds, add 1 more dc to the pattern in asterisks before your increase each time. For example, in round 3 the pattern will be *dc, dc, dc, increase*, end with a ss into the top of the ch 2.

CUSTOMIZATIONS: to create a border around your hat - attach a different colored yarn into any stitch at the brim with a knot, ch 1 and insert 1 single crochet into every stitch around the brim. if you want a thicker border, ch 2 and insert 1 dc into every stitch instead. To end the border, ss into the first ch you made and ch 1 or 2 to fasten off and cut. Alternatively, you could also make the frill section of the hat a completely different color (like the blue/pink hat shown in the cover picture above). To do that, fasten off the color you were using for the body first, then attach the different colored yarn into any stitch before you start the frill part!

And you're done!

I hope you found this pattern helpful, I'm still in the process of learning and trying to navigate the crochet community, so I'd love feedback from you! Please let me know what could've been improved or just your general thoughts on the pattern. I can't wait to see what you all create, don't forget to tag me on Instagram, and happy crocheting!

https://new.c.mi.com/ph/post/347020/
https://new.c.mi.com/ph/post/344553/
https://new.c.mi.com/ph/post/344621/
https://new.c.mi.com/ph/post/346965/
https://new.c.mi.com/ph/post/346309/
https://new.c.mi.com/ph/post/345002/
https://soundcloud.com/kimetsu-no-yaiba-castillo-infinito-doblado
https://soundcloud.com/kimetsu-no-yaiba-castillo-infinito-doblado/sets/pelisplus-demon-slayer-kimetsu-no-yaiba-castillo-infinito-doblado
https://soundcloud.com/kimetsu-no-yaiba-castillo-infinito-doblado/kimetsu-no-yaiba-castillo-infinito-ver-en-espanol-latino-9
https://soundcloud.com/kimetsu-no-yaiba-castillo-infinito-doblado/demon-slayer-kimetsu-no-yaiba-castillo-infinito-doblado-ver-completa-en-espanol-1
https://soundcloud.com/kimetsu-no-yaiba-castillo-infinito-doblado/pelisplus-demon-slayer-kimetsu-no-yaiba-castillo-infinito-2025-online-en-espanol-y-latino-13
https://soundcloud.com/kimetsu-no-yaiba-castillo-infinito-doblado/kimetsu-no-yaiba-la-fortaleza-infinita-doblado-ver-completa-en-espanol-3
https://soundcloud.com/kimetsu-no-yaiba-castillo-infinito-doblado/demon-slayer-kimetsu-no-yaiba-la-pelicula-2025-doblado-en-espanol-7
https://soundcloud.com/kimetsu-no-yaiba-castillo-infinito-doblado/guardianes-de-la-noche-kimetsu-no-yaiba-la-pelicula-2025-doblado-8
https://soundcloud.com/kimetsu-no-yaiba-castillo-infinito-doblado/demon-slayer-kimetsu-no-yaiba-castillo-infinito-pelicula-completa-espanol-latino-11
https://soundcloud.com/kimetsu-no-yaiba-castillo-infinito-doblado/pelisflix-ver-demon-slayer-kimetsu-no-yaiba-castillo-infinito-pelicula-completa-online-en-espanol-12
https://soundcloud.com/kimetsu-no-yaiba-castillo-infinito-doblado/guardianes-de-la-noche-la-fortaleza-infinita-doblado-ver-completa-en-espanol-6
https://soundcloud.com/kimetsu-no-yaiba-castillo-infinito-doblado/demon-slayer-castillo-infinito-doblado-ver-completa-en-espanol-4
https://soundcloud.com/kimetsu-no-yaiba-castillo-infinito-doblado/guardianes-de-la-noche-castillo-infinito-doblado-ver-completa-en-espanol-5
https://soundcloud.com/kimetsu-no-yaiba-castillo-infinito-doblado/demon-slayer-la-fortaleza-infinita-doblado-ver-completa-en-espanol-10
https://soundcloud.com/kimetsu-no-yaiba-castillo-infinito-doblado/guardianes-de-la-noche-kimetsu-no-yaiba-la-fortaleza-infinita-doblado-ver-completa-en-espanol-2
https://open.spotify.com/show/26iVItDzsSloDjs0yk1kZ5
https://open.spotify.com/episode/7yb0hS8kHokpVfaIsdqBKC
https://open.spotify.com/episode/5gAN835gNcdUJvZI5JP7cU
https://open.spotify.com/episode/5cBUTjdnkktjEyzu0ZM1Rd
https://open.spotify.com/episode/40tLXMC5QYbwZmfOCa9sXn
https://open.spotify.com/episode/0O4jXL6IFOsqsHwOPIJ45M
https://open.spotify.com/episode/3uNFa1tcWJFq9Qy0RVCirr
https://open.spotify.com/episode/2jwUAtzv7ahfnTnYAW8BrK
https://open.spotify.com/episode/6TnZ6eJg5aVSkISP9GHqBE
https://open.spotify.com/episode/7MEOOTVDyCBx71CX6v6udC
https://open.spotify.com/episode/33NOcXLV2BKjvXJZ7Rt2nN
https://open.spotify.com/episode/55tYzzsI8WL3qIQ4l006OM
https://open.spotify.com/episode/2s2oUJ5KUw2h4fgwF47owC
https://open.spotify.com/episode/3x8Rf2ZTW3gTJPjHwjBZTw
https://open.spotify.com/episode/0AqokmJ7oGjtKmXdnE8q8o
https://open.spotify.com/episode/4JMn09JOtRcuEQp42NN8lx


photo card/polaroid picture cover with cat ears pattern

Hi everyone, here's an adorable photo cover with cat ears! The size is completely customizable and your piece will be made to measure.

A note on the pattern: I ran out of storage while traveling and had to delete some things from my camera roll. I accidentally deleted some pictures for the steps, but I've tried to make everything as clear as possible. If you have any questions, please DM me on Instagram! 

Materials & Terminology: I used a 4.5 mm hook and yarn appropriate for that hook size. Abbreviations: CH - chain, SC - single crochet, SS - slip stitch, SC2TOG - single crochet 2 stitches together, this is basically a sc decrease where you insert hook into a stitch, yarn over and pull up a loop (2 loops on your hook), insert hook into the next stitch, yarn over and pull up a loop (3 loops of your hook), yarn over and pull through all the 3 loops on the hook. 

Part 1: The back

Start with a slip knot and ch till the length is slightly bigger on all sides of your photo (something like the picture on the left).

Sc into every ch across the row, turn your work, then sc into every stitch across the row again, keep doing this till the height is what you want. To make the edges neater, I didn't ch 1 (the turning ch) after every row as we usually do. The first stitch of the row will be hard to insert your hook into without that turning ch 1, but the edges will turn out much neater.

Part 2: The front

Start with a slip knot and chain the length that's the same as your back part, sc into every ch across the row, continue turning your work and inserting 1 sc into every stitch across the row till you have the height you want for the bottom border. 

Now you're going to start one of the side borders - sc into the stitches till the width is what you want (please make sure it's an even number of stitches for the side borders), turn your work and sc into every stitch across your row till the height is 1 less row than what you want. So for example, my back part is made up of a total of 16 rows, my bottom border is 2 rows and I will do 2 rows for the top border too. Since the front part has to be the same size as the back part, that means that I have to make my side borders with 12 rows in between the bottom and top border. So, my first side border is 11 rows (1 less than what I want).

Once you're done with the first side border, you can fasten off your work and cut. Then, attach the yarn on the other side with a knot to start the second border. Continue to sc into every stitch for the width you want, turn your work then sc into every stitch across the row, do the same number of rows as your first border + 1 more row (I did 12 rows). The next step involves a little bit of math: ch the number that is *the total number of ch you made at the start of your project - the number stitches you used to make the first and second side borders* (subtract). For example, I had 13 ch at the start of my project, I did 4 sc in each row for my first and second borders which is 8 in total. So, 13 - 8 which is 5. I felt that my ch was stretching a lot so I did 2 extra ch too. 

Sc into the stitches of your first border (this is the row that we didn't do while making this border). Turn your work and do the same number of sc rows as your bottom border. 

Part 3: The cat ears (please also refer to the "materials & terminology" paragraph at the top for an explanation of sc2tog)

Do not fasten off after you're done with the front part, turn your work and sc into the same number of stitches as your side borders. Turn your work and sc2tog across the row, repeat turning your work and sc2tog until you have just 1 stitch left at the top. 

Ch 1 and ss down the side of your ear and across the top of the top border to get to the other side. When you have the same number of stitches left as your side border, sc into them. Turn your work and sc2tog the rows till you have 1 stitch left at the top (just like on the other side). Ch 1 or 2 to fasten off and cut.

Optional step: to make the lighter part of the ear, ch till the length is slightly smaller than the ears you made, do rows of sc2tog till you have 1 stitch left at the top, ch 1 or 2 to fasten off and cut. Make 2 of these lighter ears, then you can sew them onto the larger ears. 

Part 4: Joining the front and back pieces

Usually, crochet pieces are joined together on the wrong sides with the right sides facing inwards. But I really like the neat look I get when I ss on top of the right sides. You can choose any way that you're comfortable with to join your front and back piece together! Here's what I did:

Attach the yarn at the top of one of the cat ears with a knot (I started on the left ear shown in the picture), ss down the side of the cat ear till you reach the border part, ss around the front and back pieces together by inserting your hook in both the sides. You can ch 1 or 2 to fasten off and cut here or...

Optional step: when you reach the end of the border, ch the length you want for the clasp/chain, ss into the back piece, ch 1 or 2 to fasten off and cut. 

https://www.artstation.com/watch-the-wild-robot-fullmovie-free-online-on-engl/profile

https://www.artstation.com/rubentorosmatevosian5/profile

https://soundcloud.com/ruben-toros-matevosian/watch-the-wild-robot-english-subdub-online-free-on-dreamworks-animation

https://www.scoop.it/topic/watch-the-wild-robot-fullmovie-free-download-streaming-hd

https://www.scoop.it/topic/watch-the-wild-robot-2024-fullmovie-free-online-on-123movie

https://www.scoop.it/topic/watch-the-wild-robot-2024-fullmovie-free-online-on-english

https://www.scoop.it/topic/watch-the-wild-robot-2024-fullmovie-filmyzilla-download-free-720p-480p-and-1080p

https://www.scoop.it/topic/watch-the-wild-robot-2024-fullmovie-online-download-free-720p-1080p-hd-streaming-english-sub

https://wokwi.com/projects/403127142053869569

https://royalmagazine911.blogspot.com/2015/06/ootd-he-is-legend.html

https://medium.com/p/64138b534423


And you're done!

I hope you found this pattern helpful, I'm still in the process of learning and trying to navigate the crochet community, so I'd love feedback from you! Please let me know what could've been improved or just your general thoughts on the pattern. I can't wait to see what you all create, don't forget to tag me on Instagram, and happy crocheting!

Thursday, July 4, 2024

matching pair of heart bookmarks - crochet pattern & tutorial

Hi everyone! Here's the written pattern for bookmarks for both sides of the heart (left & right). This is a companion pattern to my YouTube tutorial which you can watch here to understand how to switch colors. These bookmarks will also make the cutest little gifts for you & your reader friends/family!

Abbreviations & materials used:

sc - single crochet / ch - chain / BC - background color / CC - contrasting color (color of the heart) / I used a 4.5 mm hook & 100% acrylic yarn to make my bookmarks sturdy. If you want to adjust the size of these bookmarks (eg. make the heart bigger or the bookmark wider), you can learn how to create & crochet with your own pixel grids from this tutorial of mine.

Bookmark 1 (heart's right side)

Row 1: start with a slip knot and ch 6, sc into the 2nd ch from your hook, insert 1 sc into every ch (total 6 stitches in each row which is the same number of boxes in the pixel grid)

Row 2 - 10: insert 1 sc into every stitch with BC

Row 11: sc 6 with BC, switch colors to CC on 6th stitch

Row 12: sc 1 CC, switch colors on 1st stitch, sc 5 with BC

Row 13: sc 4 with BC, switch on 4th, sc 2 with CC

Row 14: sc 3 with CC, switch on 3rd, sc 3 with BC

Row 15: sc 2 with BC, switch on 2nd, sc 4 with CC

Row 16: sc 5 with CC, switch on 5th, sc 1 with BC

Row 17: sc 2 with BC, switch on 2nd, sc 3 with CC, switch on 3rd, sc 1 with BC

Row 18 - 28: sc 6 with BC

Bookmark 2 (heart's left side)

Row 1: start with a slip knot and ch 6, sc into the 2nd ch from your hook, insert 1 sc into every ch (total 6 stitches in each row which is the same number of boxes in the pixel grid)

Row 2 - 11: insert 1 sc into every stitch with BC

Row 12: sc 5 with BC, switch on 5th, sc 1 with CC

Row 13: sc 2 with CC, switch on 2nd, sc 4 with BC

Row 14: sc 3 with BC, switch on 3rd, sc 3 with CC

Row 15: sc 4 with CC, switch on 4th, sc 2 with BC

Row 16: sc 1 with BC, switch on 1st, sc 5 with CC, switch on 5th

Row 17: sc 1 with BC, switch on 1st, sc 3 with CC, switch on 3rd, sc 2 with BC

Row 18 - 28: sc 6 with BC

Happy reading & crocheting! - Lots of love, Mahum


https://assistirpraladebagda2.tumblr.com
https://www.artstation.com/como-assistir-pra-la-de-bagda-2-de-graca-em-portugues-dublado/profile
https://www.scoop.it/u/assistir-pra-la-de-bagda-2-filme-complet
https://www.scoop.it/topic/assista-4k-pra-la-de-bagda-2-2024-filme-dublado-online-legendado-hd-gratis
https://www.scoop.it/topic/como-assistir-pra-la-de-bagda-2-de-graca-em-portugues-dublado
https://www.scoop.it/topic/assista-hd-pra-la-de-bagda-2-2024-filme-completo-dublado-em-portuguese-full-4k-gratis
https://www.scoop.it/topic/assistir-hd-pra-la-de-bagda-2-2024-filme-completo-dublado-em-portuguese
https://www.scoop.it/topic/assistir-hd-pra-la-de-bagda-2-2024-filme-completo-legendado-em-portugues
https://www.scoop.it/u/assista-hd-pra-la-de-bagda-2-filme-complet
https://www.scoop.it/topic/assistir-pra-la-de-bagda-2-2024-filme-completo-em-portuguese
https://www.scoop.it/topic/assistir-pra-la-de-bagda-2-2024-filme-complet
https://www.scoop.it/topic/assistir-pra-la-de-bagda-2-pt-2024-filme-completo-em-portuguese
https://www.scoop.it/topic/assistir-pra-la-de-bagda-2-2024-filme-completo-dublado-e-legendado-hd-gratis
https://zenodo.org/communities/como-assistir-pra-la-de-bagda-2-de-graca-em-portugues-dublado/about

Thursday, June 20, 2024

cute & easy DUCK & FAIRY FROG plushie - free amigurumi patterns + video tutorial (inspired by squishmallows!)

cute and easy amigurumi duck and fairy frog crochet tutorial

Hi everyone, here's how to make these 2 easy & adorable squishmallow-inspired amigurumi plushies! Please note that this is a companion free pattern for my in-depth youtube tutorial. I highly recommend referring to the video for demonstrations for all the parts if you're confused, that's why I've mentioned the exact timestamp for the steps

Abbreviations & terminology

ss - slip stitch / sc - single crochet / increase - 2 sc in the SAME stitch / work in continuous rounds and use a stitch marker/bobby pin to mark the first stitch of every round

 ice cream duck 🍦

Part 1: top section (increase rounds - 7:54 in video)

Make a magic ring (or make a slip knot, chain 4, ss into the 1st chain, work the following stitches in the circle made in between the chains - if you're confused, you can watch the video at 8:58)

Round 1 - 8 sc

Round 2 (16) - 2 sc (increase) in every stitch 

Round 3 (24) - 1 sc, increase

Round 4 (32) - 2 sc, increase

Round 5 (40) - 3 sc, increase

Round 6 (48) - 4 sc, increase

Round 7 (56) - 5 sc, increase

Round 8 (64) - 6 sc, increase

Part 2: body (repeat rounds - 18:34 in video)

Round 9 to 14 (64 stitches in all of these rounds) - 1 sc in every stitch

Switch colors - demonstration at 36:08 in video

Round 15 and 16 (64 stitches in all of these rounds) - 1 sc in every stitch

Switch colors - demonstration at 36:08 in video

Round 17 to 25 (64 stitches in all of these rounds) - 1 sc in every stitch

Part 3: bottom section (decrease rounds - 20:49 in video)

Round 26 (56) - 6 sc, decrease

Round 27 (48) - 5 sc, decrease

Round 28 (40) - 4 sc, decrease

Round 29 (32) - 3 sc, decrease

Round 30 (24) - 2 sc, decrease

Round 31 (16) - 1 sc, decrease

Round 32 (8) - decrease

Round 33 (demonstration in video) - decrease until the hole is almost closed then slip stitch and fasten off

Part 4: wings (work directly on the body of the duck - in video)

Row 1 - attach your yarn and chain 1, sc x 4

Row 2 - chain 1 and turn your work, sc x 4

Row 3 - 2 sc decrease then fasten off

fairy frog 🧚

Part 1: top section (increase rounds - 7:54 in video)

Make a magic ring (or make a slip knot, chain 4, ss into the 1st chain, work the following stitches in the circle made in between the chains - if you're confused, you can watch the video at 8:58)

Round 1 - 8 sc

Round 2 (16) - 2 sc (increase) in every stitch 

Round 3 (24) - 1 sc, increase

Round 4 (32) - 2 sc, increase

Round 5 (40) - 3 sc, increase

Round 6 (48) - 4 sc, increase

Part 2: body (repeat rounds - 18:34 in video)

Round 7 to 12 (48 stitches in all of these rounds): 1 sc in every stitch

Part 3: bottom section (decrease rounds - 20:49 in video)

Round 13 (40) - 4 sc, decrease

Round 14 (32) - 3 sc, decrease

Round 15 (24) - 2 sc, decrease

Round 16 (16) - 1 sc, decrease

Round 17 (8) - decrease

Round 18 (demonstration at 25:00 in video) - decrease until the hole is almost closed then slip stitch and fasten off

Part 4: eyes (demonstration at 25:48 in video)

Make a magic ring (or make a slip knot, chain 4, ss into the 1st chain, work the following stitches in the circle made in between the chains - if you're confused, you can watch the video at 8:58)

Round 1 - 8 sc

Round 2 (16) - 2 sc (increase) in every stitch 

Round 3 (16) - 1 sc in every stitch

Part 5: white circle

Make a magic ring (or make a slip knot, chain 4, ss into the 1st chain, work the following stitches in the circle made in between the chains - if you're confused, you can watch the video at 8:58)

Round 1 - 8 sc

Round 2 (16) - 2 sc (increase) in every stitch 

Round 3 (24) - 1 sc, increase

Round 4 (32) - 2 sc, increase

Part 6: wings (demonstration at 31:42 in video)

Big part of the wing - make a slip, chain 5, skip the first chain then sc x4, insert 2 more sc in the last chain, work on the other side of the chains now...sc x2, ss, continue directly to the next part

Small part of the wing - chain 3, skip the first chain then sc x2, ss into the stitch at the bottom of the big wing

connect with me and share your work in our community by tagging me on instagram & tiktok @mahumcrochets - lots of love as always,

Mahum


https://www.artstation.com/watch-the-cursed-land-fullhd-thai/profile
https://www.artstation.com/the-cursed-land-hd-full-thai-dub/profile
https://www.artstation.com/the-cursed-land-hd-full-story-thai-sub/profile
https://www.artstation.com/the-cursed-land-watch-online-sub-thai-4k/profile
https://www.artstation.com/the-cursed-land-fullhq-720phd-story/profile
https://push.fm/fl/k2bwniyp
https://medium.com/@shoyohinata352/sdfsdsgdgsd-354daada2c1f
https://rdrama.net/post/277905

Tuesday, May 28, 2024

how to crochet cute bunny holding a tulip/love letter | free pattern + video tutorial


Hi everyone! This is the written pattern for my youtube tutorial. We're going to work in continuous rounds of single crochet, so please remember to mark the first stitch of every round with a stitch marker or bobby pin. 

IMPORTANT NOTE: you can sell the bunnies you crochet with my pattern but please note...

1. Do not use my pictures to promote your products (use your own pictures of the bunny you crocheted)

2. Tag me on all social media posts as the original creator of the pattern (my instagram & tiktok is @mahumcrochets)

3. If you're using my patterns for your business, please support me back by signing up for a free trial of Skillshare using my link - https://skl.sh/crochetwithmahum01242 (I will earn a small commission per signup that will help me purchase yarns/materials and continue creating more crochet content, thank you for your help & best wishes for your business!)

Materials:

You can use any yarn/hook for the bunnies but the size of the plushies will differ depending on what you use. I recommend using fluffy yarn with a 4.5 mm hook to get a slightly larger than hand-size bunny like mine. You can find the exact yarn I used here: amazon storefront (I didn't keep track of how much I used so I would recommend having at least 150-200 grams/2 balls of yarn)

You'll also need a needle for sewing, stitch markers/bobby pin for marking the rounds, a scissor, titch buttons for the closure on the heart envelope, safety eyes, and a different texture yarn (any dk weight cotton or acrylic yarn with a 4.5 mm hook) for the nose.

Abbreviations:

sc - single crochet / mr - magic ring / increase = 2 sc in the same stitch / ss - slip stitch

How to make a fake magic ring:

Make a slip knot, chain 3, slip stitch into the 1st chain, this will form a circle in between your chains, chain 1 and then insert the stitches of the rounds into the circle (not the chains!!)

You can also replace these steps with a regular magic ring!

Start all the pieces with a fake or regular mr.

NOTE: the steps for the head, body and legs are the same for both bunnies! Stitch counts for every round are in brackets.

Head

Round 1 - 6 sc

Round 2 - 2 sc in every stitch (12)

Round 3 - 1 sc, increase (18)

Round 4 - 2 sc, increase (24)

Round 5 - 3 sc, increase (30)

Round 6 - 4 sc, increase (36)

Round 7 to 11 - 1 sc in every stitch (36)

Round 12 - 4 sc, decrease (30)

Round 13 - 3 sc, decrease (24)

Round 14 - 2 sc, decrease (18)

Ss into the marked stitch & fasten off.

Body

Round 1 - 6 sc

Round 2 - 2 sc in every stitch (12)

Round 3 - 1 sc, increase (18)

Round 4 - 2 sc, increase (24)

Round 5 - 3 sc, increase (30)

Round 6 - 4 sc, increase (36)

Round 7 to 10 - 1 sc in every stitch (36)

Round 11 - 4 sc, decrease (30)

Round 12 - 1 sc in every stitch (30)

Round 13 - 3 sc, decrease (24)

Round 14 - 1 sc in every stitch (24)

Round 15 - 2 sc, decrease (18)

Round 16 - 1 sc in every stitch (18)

Ss into the marked stitch & fasten off.

Legs (make 2)

Round 1 - 8 sc

Round 2 - 2 sc in every stitch (16)

Round 3 and 4 - 1 sc in every stitch (16)

Ss into the marked stitch & fasten off.

NOTE: the steps for the ears and hands are different for both bunnies! It depends on what you want your bunny to hold, so choose accordingly.

Small hands (to hold heart envelope)

Round 1 - 6 sc

Round 2 - 2 sc in every stitch (12)

Round 3 and 4 - 1 sc in every stitch (12)

Ss into the marked stitch & fasten off.

Long arms (to hold a flower)

Round 1 - 6 sc

Round 2 to 7 - 1 sc in every stitch (6)

Sc the top together then fasten off.

Long ears

Round 1 - 6 sc

Round 2 - 2 sc in every stitch (12)

Round 3 - 1 sc, increase (18)

Round 4 to 12 - 1 sc in every stitch (18)

Round 13 - 1 sc, decrease (12)

Round 14 to 16 - 1 sc in every stitch (12)

Round 17 - 1 sc, decrease (8)

Sc the top together then fasten off.

Pointed ears

Round 1 - 4 sc

Round 2 - 1 sc, increase (6)

Round 3 - 1 sc, increase (9)

Round 4 and 5 - 1 sc in every stitch (9)

Ss into the marked stitch & fasten off.

BUNNY HOLDING A TULIP

Tulip

Round 1 - 6 sc

Round 2 - 2 sc in every stitch (12)

Round 3 to 5 - 1 sc in every stitch (12)

Sew the top closed by watching the demonstration in the youtube tutorial.

Stem 

Round 1 - 6 sc

Round 2 to 6 - 1 sc in every stitch (6)

Ss into the marked stitch & fasten off.

Leaf 

Make a slip knot, chain 4, skip the 1st chain then sc into the next 3 chains, chain 1 & fasten off. Sew onto the stem.

BUNNY HOLDING A HEART ENVELOPE

Envelope

Make a slip knot then chain the width you want. Skip the 1st chain then sc into every chain to make the first row. Crochet rows of sc by repeating these steps until the piece is long enough to fold in half: chain 1, turn your work, sc into every stitch. 

To make the flap, crochet 2-3 more rows of sc then repeat these steps to decrease the size of the rows on the sides (this will make the triangle shape): turn your work, skip the 1st stitch, sc into every stitch until you have 2 stitches left, skip 1 stitch then sc into the last stitch. Fasten off when you're done.

Attach your yarn at one corner of the envelope. Sc through the edges of both pieces to join the sides together. Sc along the edges of the flap too to make a neater edge.

Heart

sc - single crochet / hdc - half double crochet / dc - double crochet / ss - slip stitch

Make a fake or regular mr. Insert the following stitches into the circle: sc, hdc, dc, chain 1, ss into the circle, chain 2, dc, hdc, sc, dc, ss into the next stitch & fasten off

Support my crochet content by signing up for a free trial of Skillshare using my link - https://skl.sh/crochetwithmahum01242 (I'll earn a small commission per signup but it's completely free for you!)

Monday, May 27, 2024

how to crochet heart plushies, cushion, & keychain | video tutorial + free patterns


Hi everyone! These are the written patterns for my youtube tutorial. You can pick from 3 different sizes for the heart - small for the keychain, medium for the plushies, or large for the cushion. 

*the yarns/materials I used are available on my amazon storefront*

Abbreviations/terminology:

sc - single crochet / increase - 2 sc in the same stitch / (x) - stitch counts for the rounds are in brackets

Small Heart (keychain)

1. First piece

Make a magic ring & chain 1

Round 1: 6 sc

Round 2: 2 sc in every stitch (12)

Round 3: 1 sc in every stitch (12)

- Fasten off

2. Second piece

Repeat the same steps to make another identical piece, but do not fasten off!

3. Body

Round 4: insert your hook through the first piece & sc, then 1 sc in every stitch around that piece (12 stitches) / 1 sc in every stitch around the second piece too (12) / total 24 stitches in round 4

Round 5: 5 sc, decrease, 10 sc, decrease, 5 sc (22)

Round 6: 5 sc, decrease, 9 sc, decrease, 4 sc (20)

Round 7: 4 sc, decrease, 8 sc, decrease, 4 sc (18)

Round 8: 4 sc, decrease, 7 sc, decrease, 3 sc (16)

Round 9: 1 sc, 3 decreases, 2 sc, 3 decreases, 1 sc (10)

Round 10: 5 decreases

- Fasten off

Medium Heart (plushie)

1. First piece

You can make a magic ring or "fake" magic ring: make a slip knot, chain 4, slip stitch into the first chain, chain 1

Round 1: 8 sc

Round 2: 2 sc in every stitch (16)

Round 3: 1 sc, increase (24)

Round 4: 2 sc, increase (32)

Round 5 and 6: 1 sc in every stitch (32)

2. Second piece

Repeat the same steps to make another identical piece, but do not fasten off!

3. Body

Round 7: 4 sc through both pieces to join them / 1 sc in every stitch around the first piece (28) / 1 sc in every stitch around the second piece (28) / total 56 stitches all around

Round 8: 1 sc in every stitch (56)

Round 9: 5 sc, decrease (48)

Round 10: 1 sc in every stitch (48)

Round 11: 4 sc, decrease (40)

Round 12: 1 sc in every stitch (40)

Round 13: 3 sc, decrease (32)

Round 14 and 15: 1 sc in every stitch (32)

Round 16: 2 sc, decrease (24)

Round 17: 1 sc in every stitch (24)

Round 18: 1 sc, decrease (16)

Round 19: 1 sc in every stitch (16)

Round 20: 8 decreases

Closing round: decrease in every stitch until the hole closes

- Fasten off

4. Legs

Follow this tutorial to make the legs: jellycat bunnies (go to the 'feet/legs' section of the video at 24:32)

Large Heart (cushion)

1. First piece

You can make a magic ring or "fake" magic ring: make a slip knot, chain 4, slip stitch into the first chain, chain 1

Round 1: 8 sc

Round 2: 2 sc in every stitch (16)

Round 3: 1 sc, increase (24)

Round 4: 2 sc, increase (32)

Round 5: 3 sc, increase (40)

Round 6: 4 sc, increase (48)

Round 7 to 10: 1 sc in every stitch (48 in each round)

- Fasten off

2. Second piece

Repeat the same steps to make another identical piece, but do not fasten off!

3. Body

Round 11: 8 sc through both pieces to join them together / 1 sc in every stitch around the first piece (4) / 1 sc in every stitch around the second piece (40) / total 80 stitches all around

Round 12: 1 sc in every stitch (80)

Round 13: 7 sc, decrease

Round 14: 1 sc in every stitch

Round 15: 6 sc, decrease

Round 16 and 17: 1 sc in every stitch

Round 18: 5 sc, decrease

Round 19: 1 sc in every stitch

Round 20: 4 sc, decrease

Round 21: 1 sc in every stitch

Round 22: 3 sc, decrease

Round 23: 1 sc in every stitch

Round 24: 2 sc, decrease

Round 25: 1 sc in every stitch

Round 26: 1 sc, decrease

Round 27: 1 sc in every stitch

Round 28 & closing round: decrease in every stitch until the hole closes

- Fasten off


how to crochet a cute teddy bear wearing a sweater | easy tutorial & free pattern


Hi everyone! This is the written pattern for the teddy bear from my youtube tutorial. After crocheting the bear, you can follow the video tutorial to make a personalised sweater for your plushie. The yarns and materials I used are on my amazon storefront.

Paid partnership: If you think might benefit from therapy, I highly recommend considering online therapy with BetterHelp. Click https://betterhelp.com/mahum for 10% off your first month of therapy with our sponsor BetterHelp. Join over 4 million people who've met with a therapist on BetterHelp and started living a healthier, happier life. 

Abbreviations & terminology:

ss - slip stitch / sc - single crochet / increase = 2 sc in the same stitch / decrease = 1 sc through 2 stitches / stitch counts for each round are in brackets ()

You can start the pieces with a regular or "fake" magic ring then follow the pattern for the rounds below. To make a "fake" magic ring - make a slipknot, chain 3, slip stitch into the 1st chain, chain 1, work the stitches for round 1 into the circle formed between the chains. 

1. Head

Round 1 - 6 sc

Round 2 - 2 sc in every stitch (12)

Round 3 - 1 sc, increase (18)

Round 4 - 2 sc, increase (24)

Round 5 - 3 sc, increase (30)

Round 6 - 4 sc, increase (36)

Round 7 to 11 - 1 sc in every stitch (36 stitches in each round)

Round 12 - 4 sc, decrease (30)

Round 13 - 3 sc, decrease (24)

Round 14 - 2 sc, decrease (18)

Round 15 - 1 sc, decrease (12)

ss into the marked stitch & fasten off (leave a long tail for sewing)

2. Body

Round 1 - 6 sc

Round 2 - 2 sc in every stitch (12)

Round 3 - 1 sc, increase (18)

Round 4 - 2 sc, increase (24)

Round 5 - 3 sc, increase (30)

Round 6 - 4 sc, increase (36)

Round 7 to 9 - 1 sc in every stitch (36 stitches in each round)

Round 10 - 4 sc, decrease (30)

Round 11 and 12 - 1 sc in every stitch (30 stitches in each round)

Round 13 - 3 sc, decrease (24)

Round 14 - 1 sc in every stitch (24)

Round 15 -  2 sc, decrease (18)

Round 16 - 1 sc in every stitch (18)

Round 17 - 1 sc, decrease (12)

ss into the marked stitch & fasten off (leave a long tail for sewing)

3. Legs (with 1 or 2 colors - watch the video demonstration for how to change colors!)

Round 1 - 8 sc

Round 2 - 2 sc in the same stitch (16)

Round 3 and 4 - 1 sc in every stitch (16)

Round 5 - 7 sc, 2 decreases, 5 sc (14)

Round 6 - 5 sc, 2 decreases, 5 sc (12)

ss into the marked stitch & fasten off (leave a long tail for sewing)

4. Arms

Round 1 - 8 sc

Round 2 to 7 - 1 sc in every stitch (8 stitches in each round)

2 sc across the top of the arm to close the hole then ss & fasten off (leave a long tail for sewing)

5. Ears 

Round 1 - 8 sc

Round 2 - 2 sc in the same stitch (16)

Round 3 - 1 sc in every stitch (16)

ss into the marked stitch & fasten off (leave a long tail for sewing)

Inner ear in a different color  - 6 sc into a magic ring, chain 1 then fasten off (leave a long tail for sewing)

Tag me in your creations on Instagram & TikTok @mahumcrochets for a chance to be featured on my accounts <3 

Sunday, May 26, 2024

how to crochet cute bunny holding a heart/strawberry | easy mini plushie tutorial and free pattern


Hi everyone! This is the written pattern for my youtube tutorial. Please remember to mark the first stitch of every round with a stitch marker or bobby pin and refer to the video tutorial for demonstrations. 

If you find this pattern & tutorial helpful, please support my channel by signing up for a completely free trial of Skillshare (my favourite online learning platform with over a thousand creative classes - I've been working with them as a sponsor for more than a year now thanks to you!): click to sign up :)

Abbreviations/notes:

ss- slip stitch / sc - single crochet / increase - 2 sc in the same stitch / decrease - invisible decrease by sc 2 stitches together / stitch counts are in brackets (X) after each round

Start every piece with a magic ring and chain 1 (ignore the chain because it doesn't count as a stitch!). End every piece by slip stitching the marked stitch, chain 1, then cut and pull to fasten off.

1. Head

Round 1: 6 sc

Round 2: 2 sc in every stitch (12)

Round 3: 1 sc, increase (18)

Round 4: 2 sc, increase (24)

Round 5 to 8: 1 sc in every stitch (24 stitches in each round)

Round 9: 2 sc, decrease (18)

Round 10: 1 sc, decrease (12)

2. Legs (make 2 - fasten off the first leg, continue the body with the second leg)

Round 1: 6 sc

Round 2: 2 sc in every stitch (12)

Round 3 and 4: 1 sc in every stitch (12 in each round)

3. Body 

Round 5: 1 sc in every stitch (24 in total around both legs)

Round 6 and 7: 1 sc in every stitch (24 in each round)

Round 8: 2 sc, decrease (18)

Round 9: 1 sc in every stitch (18)

Round 10: 1 sc, decrease (12)

Round 11: 1 sc in every stitch (12)

4. Arms/hands (make 2)

Round 1: 6 sc

Round 2, 3, and 4: 1 sc in every stitch (6 in each round)

Sc 2 through the stitches at the top to close the hole

5. Long ears (make 2)

Round 1: 6 sc

Round 2: 2 sc in every stitch (12)

Round 3 to 8: 1 sc in every stitch (12 in each round)

Round 9: 1 sc, decrease (8)

Round 10 to 12: 1 sc in every stitch (8 in each round)

Sc 3 through the stitches at the top to close the hole

6. Heart

Repeat the steps below twice to make two sides of the heart (fasten off the first, continue from the second): 

Round 1: 6 sc

Round 2: 1 sc in every stitch (6)

Connect the two pieces with a sc through both stitches...

Round 3: 1 sc in every stitch (12 in total around both pieces)

Round 4: 1 sc in every stitch (12)

Round 5: 6 decreases

Decrease until the hole closes, ss, then fasten off

7. Strawberry 

Round 1: 6 sc

Round 2: 1 sc, increase (9)

Round 3: 2 sc, increase (12)

Round 4: 1 sc in every stitch (12)

Round 5: 2 sc, decrease (9)

8. Leaves

Make a magic ring and chain 3, skip the 1st chain then sc into the next 2 stitches, ss into the magic ring

Repeat these steps 3 to 4 more times to make more leaves: chain 3, skip the 1st chain then sc into the next 2 stitches, ss into the magic ring

Small reminder - if you found this pattern & tutorial helpful, please support my channel by signing up for a completely free trial of Skillshare (my favourite online learning platform with over a thousand creative classes!): click to sign up :)

Friday, May 24, 2024

it ends with us inspired book sleeve (crochet pattern/tutorial)

Hi everyone! So many of you asked me to crochet a book sleeve and here's my attempt at crocheting one inspired by It Ends With Us. I'm not completely happy with the result, but I'll be turning this into a series where I crochet book sleeves/covers inspired by some books I love, so many more bookish projects are coming in the future!

A note on this pattern: I've included step-by-step instructions for how I made the book sleeve part but the lily flower charm is not my original design! I've included the link to the youtube tutorial I followed to make it as well as some details related to that part. With this pattern, I'm taking credit for the way in which I crocheted the book sleeve and the idea behind it, NOT the lily flower. That being said, I can't wait to see what you come up with! Please tag me in your creations (or send me a picture!) and feel free to DM me on Instagram (@mahumcrochets) if you have any questions.

Materials & Terminology:

I used a 4.5 mm hook, off-white and light pink yarn appropriate for that hook size, and a thinner magenta yarn. Abbreviations: HDC - half double crochet, SS - slip stitch, CH - chain.

Part 1: The sleeve
Start by making a slipknot and chain the length of your book's spine, hdc into the second ch from your hook till the end of the row, when you reach the last ch space - hdc 3 into the same ch, now you'll be working on the other side of your chains not on top of the hdc row that you just made, insert 1 hdc into every ch till the end of the row, when you reach the space where you inserted your very first hdc in the beginning - insert 2 more hdc into the same space (total 3 hdc in that space), now you'll be working in rounds without any increases or chains in between - keep inserting 1 hdc into every stitch till the sleeve is as big as you want.

Part 2: The flower & leaf charm
I used a thicker light pink yarn first and followed this tutorial for 2 rows of petals: click here.

For the magenta part, I used a thinner yarn and did the following steps that are similar to what's shown in the tutorial but decreased them to make the center part smaller: start with a magic ring, ch 2, hdc 6 into the magic ring, ss into the top of the ch 2, ch 4, ss into the 2nd ch from your hook, ss into the other 2 chains, repeat the steps in asterisks around the round *ss into the front loop of the hdc stitch, ch 4, ss into the 2nd ch from your hook, ss into the other 2 chains*, ss into the first stitch you made, ch 1 or 2 to fasten off and cut.

I followed this tutorial for the leaf: click here. When you're done, sew the pieces in the center of your book sleeve (you just have to sew the middle of the flower on your sleeve). 

Part 3: The border and clasp
Attach your border yarn color to any stitch with a knot, insert 1 hdc into every stitch around the round, ss into the first hdc you made, ss in every hdc stitch that you made around the sleeve till you reach the part where you want to add your clasp, ch the length you want for the clasp, leave a bit of gap and ss back into the hdc stitches, continue ss around the sleeve till you reach the first ss you made, ch 1 or 2 to fasten off and cut.

And you're done!

I hope you found this pattern helpful, I'm still in the process of learning and trying to navigate the crochet community, so I'd love feedback from you! Please let me know what could've been improved or just your general thoughts on the pattern. I can't wait to see what you all create, don't forget to tag me on Instagram, and happy crocheting!

Thursday, May 23, 2024

adorable frog holding a heart (customisable crochet pattern)

Hi everyone! This adorable frog can be turned into a charm, keychain, or mini pouch for your headphones (which you can attach to any of your bags with a chain). I can't wait to see how yours turn out!

Here are a few things to keep in mind while using this pattern:

To make this, you should be an advanced beginner, intermediate level crocheter, or know how to make a magic ring, crochet in a round (I've included step-by-step instructions for this), increase, single/double/half double/triple crochet, slip stitch, and most importantly - SEW. This pattern doesn't show you how to sew the pieces together. However, that part is pretty self-explanatory since you just have to sew the pieces as shown in my pictures in the pattern below. That being said, I can't wait to see what you come up with! Please tag me in your creations (or send me a picture!) and feel free to DM me on Instagram (@mahumcrochets) if you have any questions.

Materials & Terminology:

I used a 4.5 mm hook and these yarn colors: light pink (heart), green (frog), off-white (center of the frog and eyeballs), and brown (pupils and happy face). Abbreviations: SC - single crochet, DC - double crochet, HDC - half double crochet, TC - triple crochet, SS - slip stitch, CH - chain.

Part 1: The Heart <3
Start by making a magic ring and ch 2. Insert all of the next stitches into the magic ring: 3 tc, 3 dc, ch 1, 1 tc, ch 1, 3 dc, 3 tc, ch 2, ss into the magic ring, ch 1 or 2 then cut and fasten off by tightening the ends.

Part 2: The Frog's Body 
Round 1 (off-white) - Start by making a magic ring and ch 2. Insert 10 dc into the magic ring. Ss into the top of the ch 2 (total 10 stitches)
Round 2 (off-white) - ch 2, insert 2 dc into every stitch around the round until you reach the ch 2, ss into the top of the ch 2 (total 20 stitches)
Round 3 (green) - make a slip knot with your green yarn and attach it to your work with ch 2 in the ss you made with the off-white, repeat the steps in asterisks till the end of the round *dc, 2 dc in the same stitch* (for beginners: insert 1 dc into one stitch, then in the next stitch insert 2 dc)
Round 4 (green) - ch 1, repeat the steps in asterisks till the end of the round *sc, sc, sc, 2 sc into the same stitch*, ss into the ch 1, ch 1 or 2 then cut and fasten off by tightening the end.

[ Optional part ] If you want to turn your frog into a pouch for headphones, you need to also crochet the back part for it. To make that, follow the same steps as the frog's body with only green yarn. 


Part 3: The Frog's Hands
Attach your yarn into any of the stitches with a knot.
Row 1 - ch 1 and sc into the same stitch, sc 3 more times into the next stitches
Row 2 - turn your work and sc 4 times into the stitches from row 1
Row 3 - turn your work and sc 4 times into the stitches from row 2
For row 4 and 5, you need to sc 2 stitches together (sc2tog). To do this, you can into one stitch, pull up a loop (you’ll have 2 loops on your hook), go into the next stitch, pull up a loop (you’ll have 3 loops on your hook), yarn over and pull through all 3 loops. So in row 4, sc2tog 2 times and in row 5, sc2tog 1 time.

Part 4: The Details
Green (eyes) - start with a magic ring and ch 2, insert 9 hdc into the magic ring, ss into the top of the ch 2, ch 1 or 2 then cut and fasten off by tightening the ends.
Off-white (eyeballs) - start with a magic ring and ch 1, insert 6 sc into the magic ring, ss into the top of the ch 1, ch 1 or 2 then cut and fasten off by tightening the ends.
Pink (blush) - start with a magic ring and ch 1, insert 3 sc into the magic ring, ss into the top of the ch 1, ch 1 or 2 then cut and fasten off by tightening the ends.
Brown (pupils, I used a thinner yarn for this part) - start with a magic ring and ch 1, insert 2 sc into the magic ring, ss into the top of the ch 1, ch 1 or 2 then cut and fasten off by tightening the ends.

Part 5: Sew it all Together
I sewed all the eye pieces together first, then the frog's hands into the heart and body, then the blush onto the cheek area, and lastly the front part of the frog's body to the back. If you want to attach your frog to a bag: attach the green yarn into a stitch with a knot in the area you want your chain to start, chain till it's as long as the length you want, attach with a knot on the other side.

And you're done!

I hope you found this pattern helpful, I'm still in the process of learning and trying to navigate the crochet community, so I'd love feedback from you! Please let me know what could've been improved or just your general thoughts on the pattern. I can't wait to see what you all create, don't forget to tag me on Instagram, and happy crocheting!

how to crochet a cute bucket hat of any size (customisable &amp; beginner friendly pattern)

Hi everyone! With this pattern, you can crochet yourself or your pets (or stuffed animals!) a bucket hat with a really cute frilly trim.  A ...