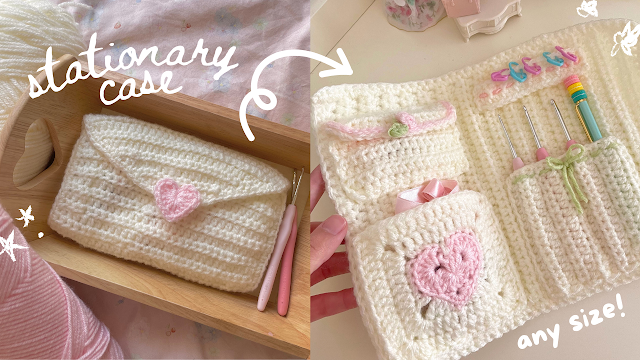
Hi everyone! This is the written pattern for my youtube tutorial. Please don't skip the explanations in the video so you can easily customise the size and design.
Step 1: Case
Row 1 - Make a slip knot, chain the width you want (I did 30 chains), skip the 1st chain, insert 1 hdc into every chain
Row 2 onwards - chain 1, turn your work, insert 1 hdc into every stitch
Crochet rows of hdc until the case is the size you want (I did 32 rows), do not fasten off when you're done! Leave this for later while you make step 2...
Step 2: Inside details
Detail 1 - granny square pocket
You can make any granny square and sew it on the case with the running stitch demonstrated in the video, here are some from my channel...
heart, bow, & solid granny square / star granny square
Detail 2 - pouch
Make the body - slip knot, chain the desired width (I did 17), skip the 1st chain, insert 1 hdc into every chain, chain 1 & turn your work to start a new row, hdc into every stitch, crochet rows of hdc until it's the desired size (I did 6 rows), fasten off then sew onto the case
Flap - slip knot, chain the same number as the body, skip the 1st chain, insert 1 hdc into every chain, chain 1 & turn your work to start a new row, hdc into every stitch, crochet rows of hdc until it's the desired size (I did 2 rows), to make the last row *hdc 2 stitches together, hdc inti every stitch until you reach the middle, chain 1 & skip the next stitch to make a hole for the button, hdc into every stitch until you have 2 stitches left, hdc 2 stitches together*, fasten off, ss around the edges to create a border in a contrasting color, sew onto the case directly on top of the body
Rose button - make a magic ring, insert 3-5 sc, ss into the chain & fasten off
Mini leaf - make a slip knot, chain 3, ss into the 2nd chain, sc into the 3rd chain, fasten off
Sew the leaf onto the rose, then sew the button onto the body of the pouch
Detail 3 - pocket with divisions
Row 1 - Make a slip knot, chain the width you want (I did 17 chains), skip the 1st chain, insert 1 hdc into every chain
Row 2 onwards - chain 1, turn your work, insert 1 hdc into every stitch
Crochet rows of hdc until the piece is the size you want (I did 12 rows), fasten off & sew vertically onto the case
Skip a number of rows (I added a division every 3 rows) then sew down the line (through the piece and case) with the running stitch to create divisions.
Detail 4 - mini ribbon piece
Row 1 - Make a slip knot, chain the width you want (I did 17 chains), skip the 1st chain, insert 1 hdc into every chain
Row 2 onwards - chain 1, turn your work, insert 1 hdc into every stitch
Crochet rows of hdc until the piece is the size you want (I did only 2 rows), fasten off, thread a ribbon through the centre of the piece then sew onto the case


No comments:
Post a Comment